Spling BootでDB更新ができるようになるまでの経緯をメモします。
事前準備
Eclipseのダウンロード
公式サイトから最新版をダウンロードします。
Pleiades All in Oneの最新版から、JavaのFull EditionまたはStandard Editionをダウンロードします。
Full Editionをダウンロードした方が日本語化等まで完了していて楽なのですが、容量が大きくて時間がかかるのでStandard Editionをダウンロードしました。
JDKのインストール(確認)
以下のように、コマンドプロンプトからバージョンを調べた時に結果が出ていれば既にインストールされています。
バージョンが表示されなかった場合は、JDKのインストールが必要です。
|
1 2 |
javac -version javac 18.0.1.1 |
インストールが必要だった場合の参考:https://codeforfun.jp/how-to-install-java-jdk-on-windows-and-mac/
MySQLのインストール(確認)
|
1 2 3 4 |
JDKと同様に、バージョンが表示されれば既にインストールされています。 表示されなかったら、MySQLのインストールが必要です。 mysql --version mysql Ver 8.0.28 for Win64 on x86_64 (MySQL Community Server - GPL) |
インストールが必要だった場合の参考:https://www.dbonline.jp/mysql/install/index1.html
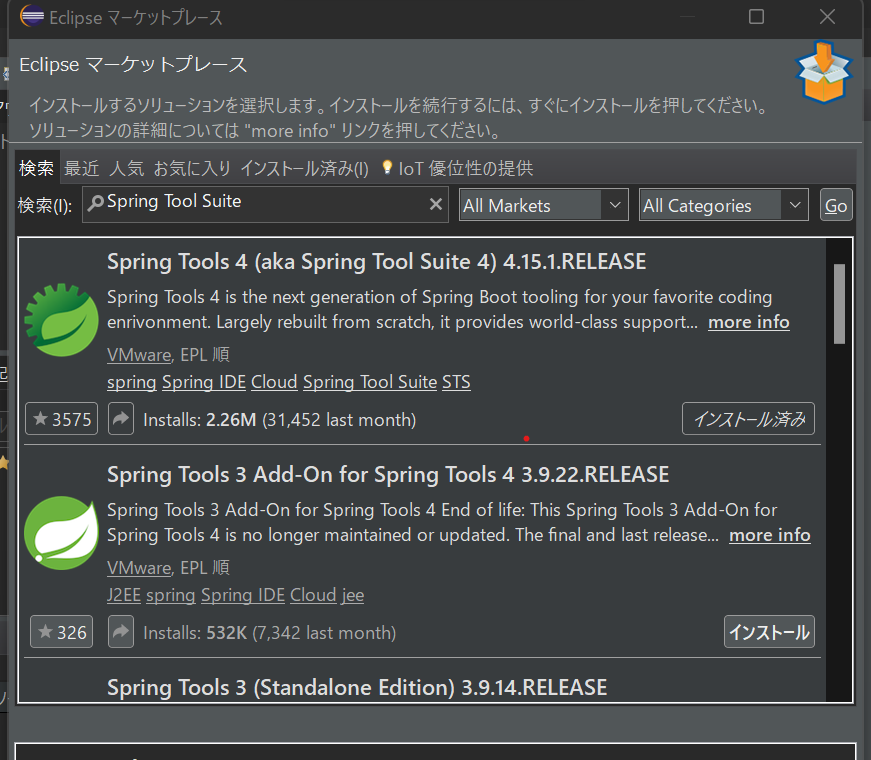
Spring Tool Suite(STS)のインストール
ヘッダーのヘルプ(H)
→Eclipseマーケットプレース
→Spring Tool Suiteで検索(Goを押下)
→画面の指示に従って確認、完了を押下
プロジェクトの作成
1. ヘッダーのファイル→新規→プロジェクト(R)
2. Spring Boot>Spring スターター・プロジェクト
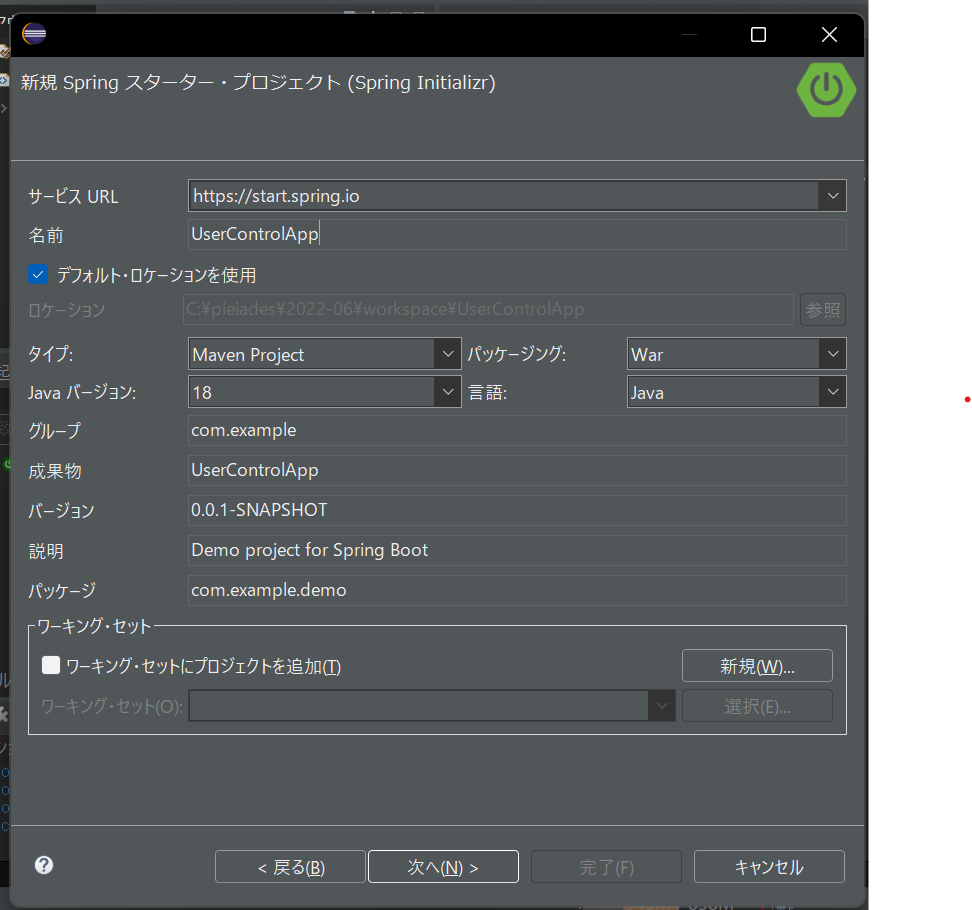
3. プロジェクトの基本設定
タイプでGradleを選択した場合はbuild.gradle、Mavenを選択した場合はpom.xmlが管理ファイルになります。
どちらを選んでも、追加で何かをインストールする時以外、大きな違いはないかと思います。
4.機能の選択
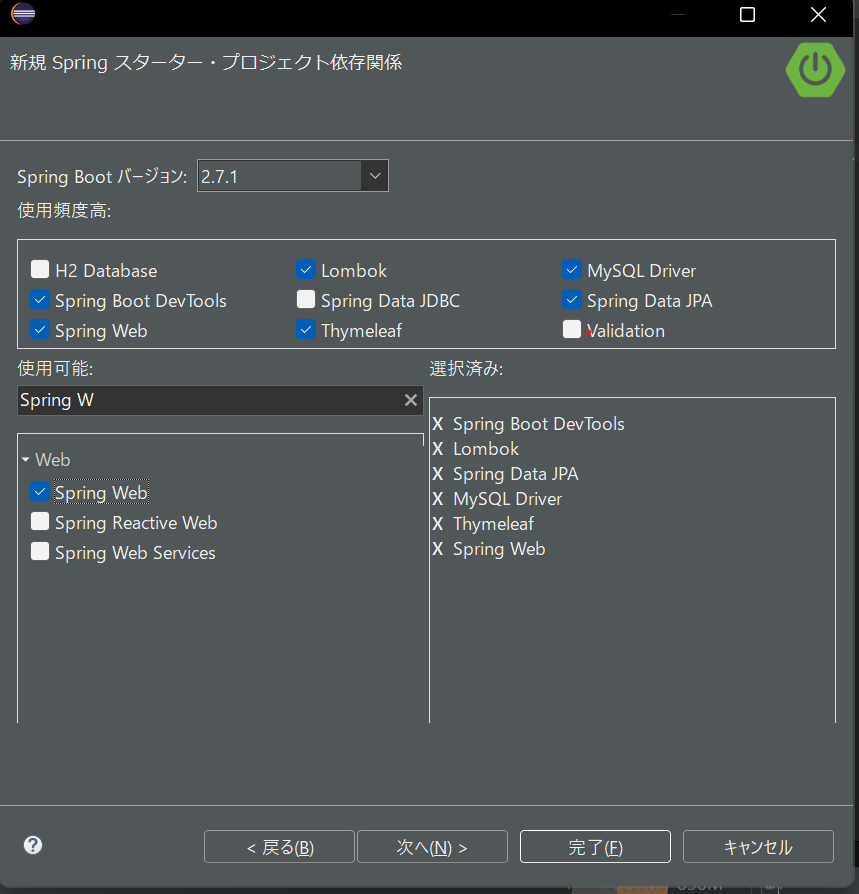
ここで選択しておくと、後でpom.xml等を編集する必要がなくなります。
選択しなかったときは後続でMySQLに接続しようとしたときに「Cannot load driver class: com.mysql.cj.jdbc.Driver」と出てしまいました。(pom.xml/build.gradleの設定不足)
- Lombok
- Spring Data JPA
- MySQL Driver
- Thymeleaf
- Spring Web
5. 画面の指示に従って「次へ」と「完了」を押し、プロジェクトを作成します。
6. 4番で選択した機能が、pom.xml/build.gradleに表れているか確認します。
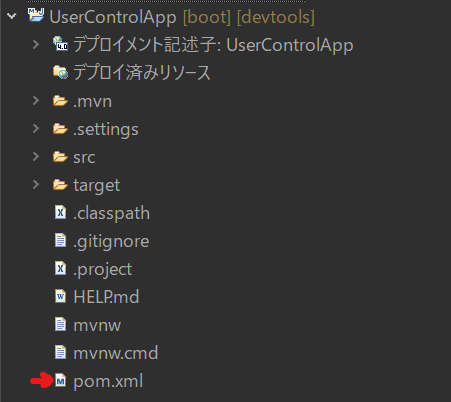
作成したアプリ名直下の、pom.xmlまたはbuild.gradleに設定ファイルがあります。
dependenciesに、先ほど選択した機能が含まれているはずです
|
1 2 3 4 5 6 7 8 9 10 11 12 13 14 15 16 17 18 19 20 21 22 23 24 25 26 27 28 29 30 31 32 33 34 35 36 37 38 39 40 41 |
<dependencies> <dependency> <groupId>org.springframework.boot</groupId> <artifactId><strong>spring-boot-starter-data-jpa</strong></artifactId> </dependency> <dependency> <groupId>org.springframework.boot</groupId> <artifactId><strong>spring-boot-starter-thymeleaf</strong></artifactId> </dependency> <dependency> <groupId>org.springframework.boot</groupId> <artifactId><strong>spring-boot-starter-web</strong></artifactId> </dependency> <dependency> <groupId>org.springframework.boot</groupId> <artifactId>spring-boot-devtools</artifactId> <scope>runtime</scope> <optional>true</optional> </dependency> <dependency> <groupId>mysql</groupId> <artifactId><strong>mysql-connector-java</strong></artifactId> <scope>runtime</scope> </dependency> <dependency> <groupId>org.projectlombok</groupId> <artifactId><strong>lombok</strong></artifactId> <optional>true</optional> </dependency> <dependency> <groupId>org.springframework.boot</groupId> <artifactId>spring-boot-starter-tomcat</artifactId> <scope>provided</scope> </dependency> <dependency> <groupId>org.springframework.boot</groupId> <artifactId>spring-boot-starter-test</artifactId> <scope>test</scope> </dependency> </dependencies> |
参考:https://medium-company.com/spring-boot%e7%92%b0%e5%a2%83%e6%a7%8b%e7%af%89/
MySQLの接続設定
DBとして事前にインストールしたMySQLを利用します。
コマンドプロンプトを開いて、MySQLを起動します。
|
1 |
mysql --user=root --password |
パスワードを入力してログインしたら、今回のプロジェクトで使うDBを用意します。
|
1 |
CREATE DATABASE db_name; |
データベース一覧を確認して、作成したデータベース名が表示されることが確認出来たら成功です。
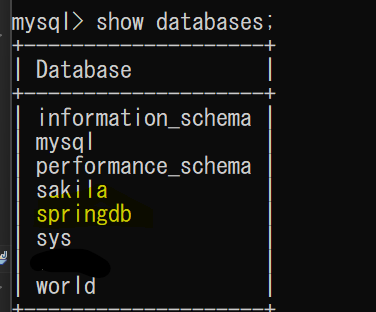
src>resources>application.propertiesを開き、以下入力します。
|
1 2 3 4 |
spring.datasource.url=jdbc:mysql://localhost/springdb #dbの名前 spring.datasource.username=root #MySQLのユーザーの名前 spring.datasource.password=passwordpassword #MySQLのパスワード spring.datasource.driver-class-name=com.mysql.cj.jdbc.Driver |
この状態で起動できれば成功です。
プロジェクトを右クリック→実行→Spring Bootアプリケーションを選択し、コンソールにエラーメッセージが表示されないことを確認します。
画面に文字を表示させる
とりあえず、画面に何かを表示させてみましょう。
2つのファイルを作成します。
1つはHTMLを呼び出すJavaファイル(コントローラー)で、src>main>javaの中に作成します。
もう一つは画面表示のHTMLファイルで、src>main>resources>templatesの中に作成します。
ファイルはヘッダーのファイル(F)>新規で作成できます。
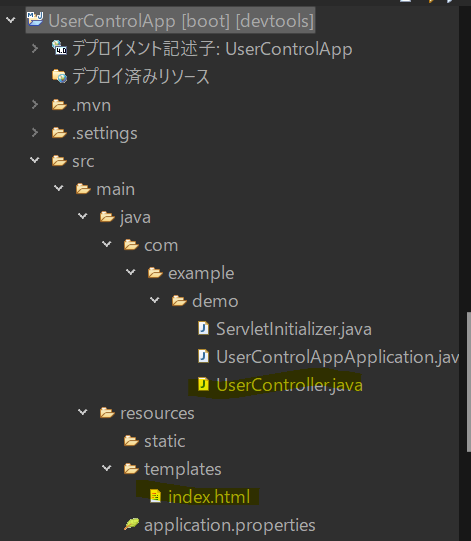
UserController.java
value=""のURLにアクセスされたら、index.htmlを返します。
|
1 2 3 4 5 6 7 8 9 10 11 12 13 14 15 16 |
package com.example.demo; import org.springframework.stereotype.Controller; import org.springframework.ui.Model; import org.springframework.web.bind.annotation.RequestMapping; import org.springframework.web.bind.annotation.RequestMethod; @Controller public class UserController { @RequestMapping(value = "/", method = RequestMethod.GET) public String display(Model model) { return "index"; } } |
index.html
|
1 2 3 4 5 6 7 8 9 10 |
<!DOCTYPE html> <html> <head> <meta charset="UTF-8"> <title>Insert title here</title> </head> <body> Welcome </body> </html> |
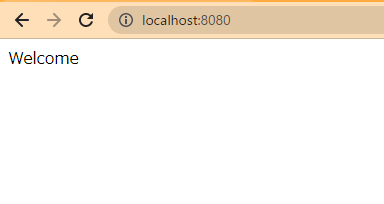
MySQLの接続確認で既にアプリは起動済みなので、以下にアクセスします。
シンプルに、index.htmlに書いた文字が表示されます。
DBを表示、作成、更新 (CRUD)
いよいよ、DBを使います。CRUDと言いながら、削除は使わないのでCRUです。
テーブルを作成
MySQLからテーブルを作成します。
|
1 2 3 4 5 6 7 8 9 |
CREATE TABLE `springdb`.`user` ( `id` BIGINT NOT NULL AUTO_INCREMENT, `name` VARCHAR(255) NOT NULL, `address` VARCHAR(255) NULL, `phone` VARCHAR(255) NULL, `update_date` DATETIME NOT NULL, `create_date` DATETIME NOT NULL, `delete_date` DATETIME NULL, PRIMARY KEY (`id`)); |
Javaファイル/HTMLファイルの更新
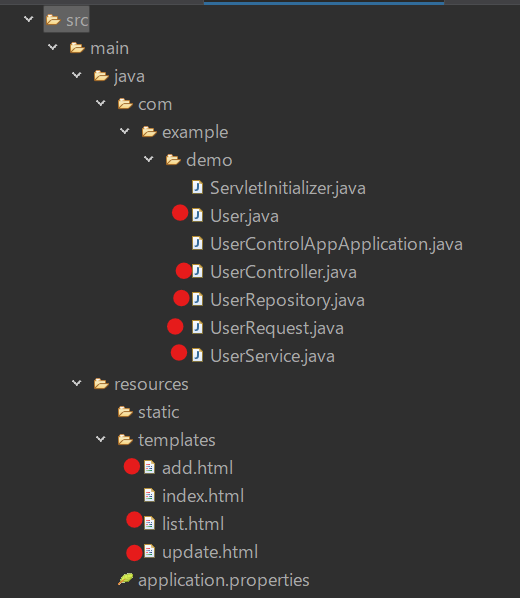
以下、Javaファイルはmain>java>com>example>demo配下、htmlファイルはmain>resources>templates配下に作ります。
最終的なファイルの数がこちらです。赤い印のファイルを新規作成、更新します。
エンティティ (User.java)
テーブルごとに、エンティティファイルが必要になります。
|
1 2 3 4 5 6 7 8 9 10 11 12 13 14 15 16 17 18 19 20 21 22 23 24 25 26 27 28 29 30 31 32 33 34 35 36 37 38 39 40 41 |
package com.example.demo; import java.util.Date; import javax.persistence.Column; import javax.persistence.Entity; import javax.persistence.GeneratedValue; import javax.persistence.GenerationType; import javax.persistence.Id; import javax.persistence.Table; import lombok.Data; @Entity @Data @Table(name = "user") public class User { @Id @Column(name = "id") @GeneratedValue(strategy = GenerationType.IDENTITY) private Long id; @Column(name = "name") private String name; @Column(name = "address") private String address; @Column(name = "phone") private String phone; @Column(name = "update_date") private Date updateDate; @Column(name = "create_date", updatable = false) private Date createDate; @Column(name = "delete_date") private Date deleteDate; } |
ポイントはcreated_dataのupdatable=false.
作成日は一度登録したら更新しないので、このような設定にしておきます。
レポジトリ (UserRepository.java)
エンティティのUserを更新するために必要です。
|
1 2 3 4 5 6 7 8 9 10 |
package com.example.demo; import org.springframework.data.jpa.repository.JpaRepository; import org.springframework.stereotype.Repository; import com.example.demo.entity.User; @Repository public interface UserRepository extends JpaRepository<User, Long> { } |
リクエスト (UserRequest.java)
Data Transfer Object。HTMLからDBを更新するときに、データを格納するオブジェクトを定義します。
Bean Validationなどを使って、DBに登録しようとしているオブジェクトの桁数や型が正しいかチェックする機能を追加することもできます。
|
1 2 3 4 5 6 7 8 9 10 11 12 13 |
package com.example.demo; import java.io.Serializable; import lombok.Data; @Data public class UserRequest implements Serializable { private String name; private String address; private String phone; private String update_date; } |
サービス (UserService.java)
コントローラーで呼び出す具体的な処理を書く場所です。
|
1 2 3 4 5 6 7 8 9 10 11 12 13 14 15 16 17 18 19 20 21 22 23 24 25 26 27 28 29 30 31 32 33 34 35 36 37 38 39 40 41 42 43 44 45 46 47 48 49 |
package com.example.demo; import java.util.Date; import java.util.List; import java.util.Optional; import org.springframework.beans.factory.annotation.Autowired; import org.springframework.stereotype.Service; import org.springframework.transaction.annotation.Transactional; @Service @Transactional(rollbackFor = Exception.class) public class UserService { @Autowired UserRepository userRepository; /*全量取得*/ public List<User> searchAll() { return userRepository.findAll(); } /*作成*/ private User CreateUser(UserRequest userRequest) { Date now = new Date(); User user = new User(); user.setName(userRequest.getName()); user.setAddress(userRequest.getAddress()); user.setPhone(userRequest.getPhone()); user.setCreateDate(now); user.setUpdateDate(now); return user; } public void create(UserRequest userRequest) { userRepository.save(CreateUser(userRequest)); } /*特定のIDのレコードを取得*/ public Optional<User> selectById(Long id) { return userRepository.findById(id); } /*更新*/ public void update(User user) { userRepository.save(user); } } |
コントローラー (UserController.java)
index.htmlを表示させるために作ったコントローラーに、追記します。
|
1 2 3 4 5 6 7 8 9 10 11 12 13 14 15 16 17 18 19 20 21 22 23 24 25 26 27 28 29 30 31 32 33 34 35 36 37 38 39 40 41 42 43 44 45 46 47 48 49 50 51 52 53 54 55 56 57 58 59 60 61 62 63 64 65 66 |
package com.example.demo; import java.util.Date; import java.util.List; import org.springframework.beans.BeanUtils; import org.springframework.beans.factory.annotation.Autowired; import org.springframework.stereotype.Controller; import org.springframework.ui.Model; import org.springframework.web.bind.annotation.ModelAttribute; import org.springframework.web.bind.annotation.RequestMapping; import org.springframework.web.bind.annotation.RequestMethod; import org.springframework.web.bind.annotation.RequestParam; @Controller public class UserController { //とりあえず画面表示 @RequestMapping(value = "/", method = RequestMethod.GET) public String display(Model model) { return "index"; } @Autowired UserService userService; //一覧画面の表示 @RequestMapping(value = "/user/list", method = RequestMethod.GET) public String displayList(Model model) { List<User> userlist = userService.searchAll(); model.addAttribute("userlist", userlist); return "list"; } //新規作成画面の表示 @RequestMapping(value = "/user/add", method = RequestMethod.GET) public String displayAdd(Model model) { model.addAttribute("userRequest", new UserRequest()); return "add"; } //新規作成画面からのPOST先 @RequestMapping(value = "/user/create", method = RequestMethod.POST) public String create(@ModelAttribute UserRequest userRequest, Model model) { userService.create(userRequest); return "redirect:list"; } //更新画面表示。IDを指定してレコードを取得し、更新画面に渡す。 //paramsはHTMLのSubmitのname @RequestMapping(value = "/user/update", method = RequestMethod.POST, params="edit") String edit(@RequestParam Long id, @ModelAttribute UserRequest userRequest) { java.util.Optional<User> userOpt = userService.selectById(id); User user = userOpt.get(); BeanUtils.copyProperties(user, userRequest); return "update"; } //更新して、一覧画面に戻る。UpdateDateには今日の日付を入れる。 @RequestMapping(value = "/user/update", method = RequestMethod.POST, params="regist") String regist(@RequestParam Long id, @ModelAttribute UserRequest userRequest) { User user = new User(); BeanUtils.copyProperties(userRequest, user); Date now = new Date(); user.setId(id); user.setUpdateDate(now); userService.update(user); return "redirect:list"; } } |
一覧表示画面 (list.html)
bootstrapを読み込んでいるので、CSSを書かなくてもクラスを付与するだけでそれなりのデザインになります。
|
1 2 3 4 5 6 7 8 9 10 11 12 13 14 15 16 17 18 19 20 21 22 23 24 25 26 27 28 29 30 31 32 33 34 35 36 37 38 39 40 41 42 43 44 45 46 |
<!DOCTYPE html> <html xmlns="http://www.w3.org/1999/xhtml" xmlns:th="http://www.thymeleaf.org"> <head> <title>ユーザー情報一覧</title> <link href="https://cdn.jsdelivr.net/npm/bootstrap@5.2.0-beta1/dist/css/bootstrap.min.css" rel="stylesheet" integrity="sha384-0evHe/X+R7YkIZDRvuzKMRqM+OrBnVFBL6DOitfPri4tjfHxaWutUpFmBp4vmVor" crossorigin="anonymous"> <meta charset="utf-8" /> </head> <body> <div style="margin:50px;"> <h1>ユーザー情報一覧</h1> <div> <a th:href="@{/user/add}" class="btn btn-primary">新規登録はこちら</a> </div> <table class="table"> <thead class="thead-dark"> <tr> <th>ID</th> <th>Name</th> <th>Address</th> <th>Phone Number</th> <th>Updated at</th> <th>Created at</th> <th>Edit</th> </tr> </thead> <tbody> <tr th:each="user : ${userlist}" th:object="${user}"> <td scope="row" th:text="*{id}"></td> <td th:text="*{name}"></td> <td th:text="*{address}"></td> <td th:text="*{phone}"></td> <td th:text="${#dates.format(user.updateDate, 'yyyy/MM/dd')}"></td> <td th:text="${#dates.format(user.createDate, 'yyyy/MM/dd')}"></td> <td> <form th:action="@{/user/update}" method="post"> <input type="submit" class="btn btn-outline-primary" name="edit" value="編集"> <input type="hidden" name="id" th:value="${user.id}"> </form> </td> </tr> </tbody> </table> </div> </body> </html> |
新規作成画面 (add.html)
UserRequest.javaに書いた項目は作成可能です。
|
1 2 3 4 5 6 7 8 9 10 11 12 13 14 15 16 17 18 19 20 21 22 23 24 25 26 27 28 29 30 31 |
<!DOCTYPE html> <html xmlns="http://www.w3.org/1999/xhtml" xmlns:th="http://www.thymeleaf.org"> <head> <title>ユーザー新規登録</title> <link href="https://cdn.jsdelivr.net/npm/bootstrap@5.2.0-beta1/dist/css/bootstrap.min.css" rel="stylesheet" integrity="sha384-0evHe/X+R7YkIZDRvuzKMRqM+OrBnVFBL6DOitfPri4tjfHxaWutUpFmBp4vmVor" crossorigin="anonymous"> <meta charset="utf-8" /> </head> <body> <div style="margin:50px;"> <h1>ユーザー新規登録</h1> <form th:action="@{/user/create}" th:object="${userRequest}" method="post"> <div style="margin:5px;"> <div class="form-group"> <label for="formGroupExampleInput">Name</label> <input type="text" class="form-control" th:field="*{name}"> </div> <div class="form-group"> <label for="formGroupExampleInput2">Address</label> <input type="text" class="form-control" th:field="*{address}"> </div> <div class="form-group"> <label for="formGroupExampleInput2">Phone Number</label> <input type="text" class="form-control" th:field="*{phone}"> </div> </div> <input type="submit" value="登録" class="btn btn-primary"> </form> </div> </body> </html> |
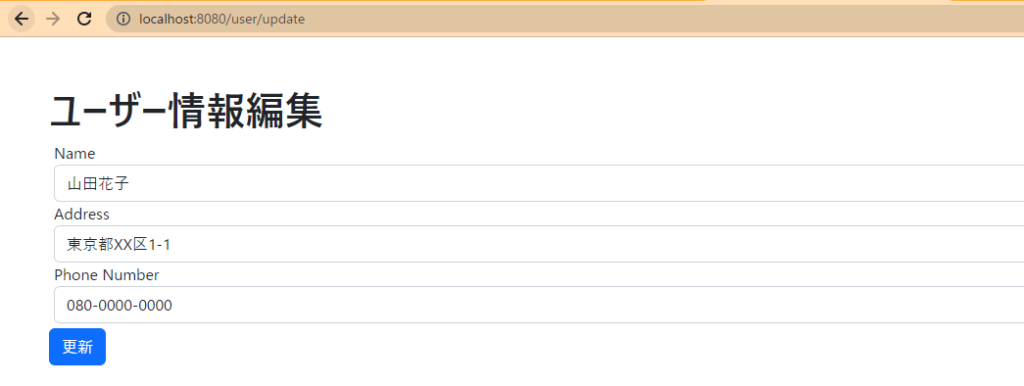
更新画面 (update.html)
更新前のレコードが初期入力されている状態になります。
|
1 2 3 4 5 6 7 8 9 10 11 12 13 14 15 16 17 18 19 20 21 22 23 24 25 26 27 28 29 30 31 32 |
<!DOCTYPE html> <html xmlns="http://www.w3.org/1999/xhtml" xmlns:th="http://www.thymeleaf.org"> <head> <title>ユーザー情報編集</title> <link href="https://cdn.jsdelivr.net/npm/bootstrap@5.2.0-beta1/dist/css/bootstrap.min.css" rel="stylesheet" integrity="sha384-0evHe/X+R7YkIZDRvuzKMRqM+OrBnVFBL6DOitfPri4tjfHxaWutUpFmBp4vmVor" crossorigin="anonymous"> <meta charset="utf-8" /> </head> <body> <div style="margin:50px;"> <h1>ユーザー情報編集</h1> <form th:action="@{/user/update}" th:object="${userRequest}" method="post"> <div style="margin:5px;"> <div class="form-group"> <label for="formGroupExampleInput">Name</label> <input type="text" class="form-control" th:field="*{name}"> </div> <div class="form-group"> <label for="formGroupExampleInput2">Address</label> <input type="text" class="form-control" th:field="*{address}"> </div> <div class="form-group"> <label for="formGroupExampleInput2">Phone Number</label> <input type="text" class="form-control" th:field="*{phone}"> </div> </div> <input type="submit" value="更新" class="btn btn-primary" name="regist"> <input type="hidden" name="id" th:value="${param.id[0]}"> </form> </div> </body> </html> |
完成


さらに頑張るなら、
- 削除日付が入力されたレコードは非表示(一覧画面を全量表示ではなくフィルターをかける)
- 削除日付を入力できるようにする
- データの追加、更新をするときにバリデーションチェックする
- 一覧のCSV出力
とかですかね